
.

Showing posts with label at-home facials. Show all posts
Showing posts with label at-home facials. Show all posts
Sunday, August 9, 2020

Saturday, August 8, 2020
A DIY At-Home BACK FACIAL—with a friend’s help of course!

I have seen articles and videos on giving yourself a back facial. If this is the avenue you want to take, go for it! However, I think you will have a better, more thorough experience if you simply ask a friend for help, perhaps a family member or even your roommate. If there is someone in your life you trust to do a good job, ask them to give you a back facial. You could get a back facial as often as you can find someone to give one to you. Just like any treatment for blemishes on your face, the more kind attention you give problem skin, the better it is for helping the healing process.
Here are some instructions for your back facial treatment:
- After taking a shower to get yourself cleaned off, lay a towel or two down on the floor and lie face down.
- Have your helper use a mild scrub mixed with water on your back. If you have large red and pus-filled blemishes, a scrub is not a good idea. It is important to exfoliate back there, but you certainly don’t want to break open the spots and possibly spread the bacteria to other places on your skin.
- Other than scrubs, a gel-peel (like a gommage) or another type of non-abrasive peel, like a papaya enzyme peel, would be preferable. If you don’t have access to an exfoliant or if it would be inappropriate to use one, just skip to the next step.
- After the scrub (or other exfoliator) is removed, apply a clay mask.
- Usually back breakouts are in the upper region, near the shoulders. If your entire back is broken out, you will probably go through a lot of mask, but it is very helpful to get it on the spots. If you don’t have enough mask to go over the entire area, be sure to dot clay liberally on all the blemishes individually—even if they cover your whole back. If possible, spread the clay over the entire area as mentioned above.

- Ideally you want to keep the mask moist. This way you won’t dry out the outer skin. You can either spray the mask with toner or filtered water. Or, if you are so inclined, your assistant can take tissues and soak them in either toner or water and place them on your skin as a compress where the clay has been applied.
- Leave the mask for 15 minutes or so.
- Then you can either shower to remove the clay or your helper can remove it with a warm (not hot) washcloth. Just be sure not to rub hard or scrub with the washcloth.
- After the mask is cleaned off, I suggest spraying one last application of toner on the area and massaging it in.
- If you have any medications or special products you are using for the blemishes, apply those last. Geranium or lavender essential oil would be a good choice to help treat the individual spots. (Both of these and essential oils in general are written about extensively on this blog. See categories.)
I have one last recommendation: Don’t let your helper pick at your blemishes unless he or she knows how to extract properly. I have heard countless stories of partners who actually relish popping their mate’s spots. I suppose it is just a natural maternal instinct that we have. But if done incorrectly, this process can cause more harm than good. However, some places may need to be extracted.
Please understand, facials, whether for your back or your face, will not eliminate your skin problems completely. Your breakout originates from a systemic imbalance, and treating the symptom (breakout) topically will only go so far. Treating the problem from the outside can and will help it on many levels, but I want to be sure you are also taking steps to figure out the real cause of the problems. Without figuring out the cause of the imbalance along with action taken toward healthier lifestyle habits, no amount of facials, back or otherwise, will fix the problem at hand.
For more information, see:
- Back Breakout—What NOT to Use
- A Note to All Pickers—you know who you are!!! (Please read up on how to do this—if you must—for the best results!)
- Sugar & Skin Problems
- Geranium (or lavender) essential oil—spot remover for breakouts: How to use it and how NOT to use it
 |
| Easier said than done |
Saturday, November 14, 2015
Solutions for Stressed Skin

Are you stressed out? If so, more than likely your skin reflects the stress you are experiencing in your life. Physical stress, such as injury, chemotherapy, or simply a hectic lifestyle, has an impact on the appearance of your skin. Even emotional stress can show up as tired-looking skin. The following are some of the many skin stress producers:
- a hectic lifestyle
- sun exposure
- sleeplessness/fatigue
- worry/concern/personal problems
- poor diet, smoking, alcohol
- poor skin care habits
- physical injury or illness
- medication/chemotherapy
Any of these can have a negative effect on the health of your skin, producing a dull complexion as well as all-around tired-looking skin. Although stress takes a toll on the body as a whole, there are several ways to combat these ill effects and to experience healthy-looking, stress-free skin all year round. The following stress reducers can bring you closer to healthy, vibrant-looking skin.
As I discuss in my book, Timeless Skin: Healthy Skin for a Lifetime, exfoliation is paramount to healthy skin. Exfoliation helps to remove dead surface cells and increases circulation to the face, which gives your skin smoother texture and a healthy glow. I tell my clients when they can't come in for a facial—exfoliate! It is certainly not the be-all and end-all, but exfoliation can take away layers of stress from your face, revealing the natural beauty hidden beneath.
Along with exfoliation, using a cleansing or clay mask will help to remove dirt and debris that may have built up in your pores. A mask also stimulates blood flow to your face, giving your skin a healthy, well-nourished glow. One of my favorite recommendations for accomplishing these two steps (exfoliation and masking) is to give yourself a facial at home.
 An at-home facial is an attempt to simulate the benefits of a professional facial in the comfort (and convenience) of your own home. As with massage, nothing takes the place of having an expert do all the work for you, but you can duplicate many of the steps of a facial, which will benefit your skin and help you feel relaxed and de-stressed!
The ingredients in an at-home facial include exfoliating, using a clay mask, and relaxing. These three steps are beneficial to all skin types, from dry to oily. You’ll need about half an hour or so for your at-home facial. You can embellish my suggestions or tailor them to your particular schedule. If you can't find the time to take too long of a breather and actually relax, you can just exfoliate and mask, then get on with your day. But taking a few minutes out of a hectic day to relax and unwind sure feels good. And dare I say if you can’t find time to relax, you most likely really need to relax!
Make your bathroom a temporary relaxation sanctuary. Fill the room with candles, draw an aromatic bath, and listen to relaxing music to ease the stresses of the day from your body. If you’re not a bath-type person, find a room in your house where you can relax—undisturbed—for 15 minutes or so. It would also be nice to have soothing music to ease you into a calm, meditative state.
To start your at-home facial, you’ll want to:
 Then go to your peaceful place (either your quiet room or bathtub), and relax. Be sure to breathe! Simply inhaling and exhaling slowly can help to reduce stress on the spot. When you’re ready to face the world again (or just ready to get out of the tub!), remove the clay mask at your sink—not with the bathwater—with tepid (not hot or cold) water. Follow with spray toner and your day or night cream, depending. Remember eye cream as well.
- Clean your skin with a facial cleanser
- Then apply use your exfoliator of choice, which might be an abrasive scrub or a gel-type, non-abrasive peel (like Yonka’s Gommage)
- Be sure to take a little extra time to exfoliate all the places you might be neglecting, like around your ears, hairline, and under your chin
- Next, apply a clay or hydrating mask. (Please read How to use a Clay Mask—Important Instructions if you don’t know to keep the mask moist. See link below.)
Then go to your peaceful place (either your quiet room or bathtub), and relax. Be sure to breathe! Simply inhaling and exhaling slowly can help to reduce stress on the spot. When you’re ready to face the world again (or just ready to get out of the tub!), remove the clay mask at your sink—not with the bathwater—with tepid (not hot or cold) water. Follow with spray toner and your day or night cream, depending. Remember eye cream as well.
An at-home facial can be done whenever you need a mini-break from a stressful day. Traveling can offer an ideal opportunity to have some uninterrupted “me” time, especially if you are away from your family and the normal stresses and responsibilities of home. It may seem impossible to take time out for yourself, but once you know it is possible, at-home facials can benefit you on several levels. Enjoy your treatment and know you are helping yourself, not just your skin, in many ways.
Even if you can’t erase the stress from your life, incorporating these few simple steps once a week can help reduce stress from your skin. Just remember, it only takes a few minutes to keep the stressed-out look away!
For skin care recommendations, see:
For some anti-stress solutions, see:
For skin care recommendations, see:
For some anti-stress solutions, see:

Tuesday, June 30, 2015
At-home facials—Advanced steps

1. Use moisturizer underneath your clay mask. With the mask lying on top, it will help to infuse the cream deep into your skin, giving you an extra dose of hydration. Cleanse your skin, exfoliate, and then before applying the clay mask put on a medium to thick layer of your favorite moisturizing cream. Apply your clay mask, spraying it with water intermittently to keep it moist. Leave it on for 15 minutes, then remove the mask by splash-rinsing with tepid water. Use your toner and moisturizer.
2. Place soothing eye pads over your eyes and relax to treat the eye area during your at-home facial. One way to do this is to steep chamomile tea (or any other relaxing, soothing herb) for several hours. Place the concentrated tea in the refrigerator to cool (perhaps the night before you are planning your facial). Then when you’re ready to lie down and relax with the clay mask on in your quiet room or bathtub, soak two cotton pads in the cooled tea and place them over your eyes. Lie back and relax, keeping the mask moist by misting with your spray bottle. When your mask is ready to come off, remove the eye pads, splash-rinse, then tone and hydrate with your moisturizer.
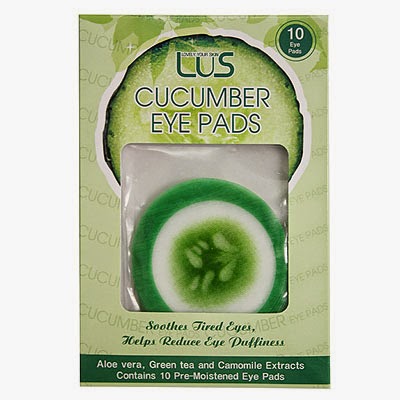
Another option is to wet a couple of round eye pads, then spray a small amount of your toner on them. Squeeze most of the moisture out, and then place the pads over your eyes. The water will dilute your toner, making soothing eye pads that are inexpensive, readily available, and easy to use.
3. Apply a thick layer of eye cream before you put the pads on for extra treatment of the eyes. Or if you want to skip eye pads altogether, simply put a thick layer of eye cream on, lie back, and relax. This under-eye skin needs special treatment too.
4. Include your neck as well as treating the skin around your eyes. If you have a special hydrating mask, this would be a good time to use it. After the clay is on your face, apply a thick layer of hydrating mask to your entire neck area. If you don’t have a specialized hydrating mask, just use a thick layer of your moisturizer. Either one will do a good job of moisturizing this forgotten area.
Whether you opt for these “advanced” steps or decide to just do the basics, giving yourself an at-home facial at least once a week (more if you have problem, congested skin) is a great way to help your skin look its best.
For more information, see:

For more information, see:
- How to use a Clay Mask—Important Instructions
- Forgotten Places: The Neck
- At-Home Facials—A DIY How-To

Thursday, May 28, 2015
A word about food as products: I’m not a fan

I’m not a fan of using homemade, kitchen/food products on your face. Regarding the photo above, I would recommend eating the avocado. As a mask, sure, it will hydrate your skin and possibly have vitamin benefits for your skin’s surface. However, it is inside your body where the benefits of this heavenly fruit are best utilized and needed. Ingesting the vitamins and nutrients from an avocado affects your whole body, not just the dead, outer skin on your face as when used as a mask. If these homemade skin care products are good enough to eat, then you should eat them, not put them topically on your skin. Your body can utilize the nutrients in food much more readily than your skin can.
Homemade products can be too intense and concentrated for a lot of peoples’ skin. If you feel the need to blend something up for your face, go right ahead. It probably won’t be harmful to your skin although most likely it will be of little help, and in my opinion it’ll be a waste of yummy food you could be eating.
Note: If you indeed decide to use food on your face, please monitor any feelings of sensitivity or irritation. If you feel any uncomfortable sensations, immediately remove the homemade product and reach for a manufactured one next time.
For more information, see:
Note: If you indeed decide to use food on your face, please monitor any feelings of sensitivity or irritation. If you feel any uncomfortable sensations, immediately remove the homemade product and reach for a manufactured one next time.
For more information, see:
 |
| Same advice for these tomatoes: eat them, please! |
Tuesday, February 22, 2011
At-Home Facials—A DIY How-To
 |
About this photo: Eat the kiwi slices—don’t put them on your face!
See A word about food as products. |
An at-home facial incorporates exfoliating, using a clay mask, and relaxing. To accomplish this, you’ll need about 30 minutes or so. If you’re too busy to slow down completely, you can just exfoliate and mask, then be on your way. However, putting aside time for you gives you more energy to give to others. It’s a simple principle, although not always so easy to implement.
To begin your at-home facial:
- First, thoroughly wash your face. Don’t skip this step! Getting your skin clean is the #1 thing to do first before doing anything else to your skin.
- Next, use your exfoliator of choice. Be sure to take a little extra time and get all the nooks and crannies well exfoliated. Getting some of the dead skin off the surface of your face not only makes your skin feel smoother, there will be less of a barrier for the clay mask (next step) to do its job.
- Now, apply a clay mask. You’ll want to keep the clay moist the entire time it is on your face. You’ve probably always heard to leave the clay on and let it dry on your face, but clay doesn’t need to dry in order to draw impurities to itself. Letting the mask dry on your face just dries that surface skin out; that takes you one step forward (clean skin), two steps back (now, dehydrated skin). Leave the mask on 15-20 minutes.
- Have a spray bottle filled with clean, filtered water handy (or better yet: Yonka’s spray Lotion) and spray your face liberally when you first apply the mask, then spray intermittently during the time the clay stays on. As you may have heard me say, keeping the mask moist the entire time it’s on your face is imperative for the health of your skin.
Note: You don’t have to use a clay mask, you can use any type of mask. I prefer clay for all skin types because not only does it have a deep-cleaning action, it also helps stimulate circulation, and we can all use more of that for the health of our skin cells.
 Last but not least, go to a peaceful place (either a quiet room in your home or a nice hot bathtub), and relax
with the mask on. Breathe in calmness and exhale any stress you may be feeling. Deep breathing has a decidedly soothing effect. This step may seem inconsequential, but it
truly is important.
Last but not least, go to a peaceful place (either a quiet room in your home or a nice hot bathtub), and relax
with the mask on. Breathe in calmness and exhale any stress you may be feeling. Deep breathing has a decidedly soothing effect. This step may seem inconsequential, but it
truly is important.When my clients come in for their facials, relaxation is an integral part of the procedure for the health of their skin. For some, the only peaceful place where they can relax—undisturbed—is in the facial room. Trying to replicate this type of environment at home is important to do if at all possible. Before starting your at-home facial, prearrange to have the kids taken care of (or whatever else) so you can just lie in the tub or on a couch, listen to some music, perhaps sip a nice glass of wine—and truly relax.
When its time to remove the mask, I recommend doing so at your sink—not with the bath water, which is either filled with bath products or simply too hot. Now you’ll be thankful you kept the mask moist. If not, you’d have to remoisten it with water in order to get it off, which even then can be difficult. (Letting the clay dry can also make any skin look red and feel sensitive.) Another alternative would be to shower after your bath and remove the mask that way.
Once the clay is rinsed off, apply your toner and moisturizer. Don’t forget eye cream as well. If you took a bath, be sure to moisturize your entire body afterward. Use this time to treat your whole body, not just your face.
Although it may seem impossible to take time out for yourself, once you do, you will see it is possible. At-home facials can benefit you on several levels just like a professional facial can. Enjoy your home treatment and know you are helping yourself in many ways, not just your skin.
For more information, see:

Subscribe to:
Posts (Atom)